Business Integration Solutions documentation
BIS overview
Business Integration Solutions uses a modular app structure. The BIS monolith is split into several apps. At the base of everything is the STAEDEAN-Common app. In a regular app environment, STAEDEAN-Common is the first app placed on top of the base BC app. This app does not appear in the Extension list in Business Central and functions as a dependency app.
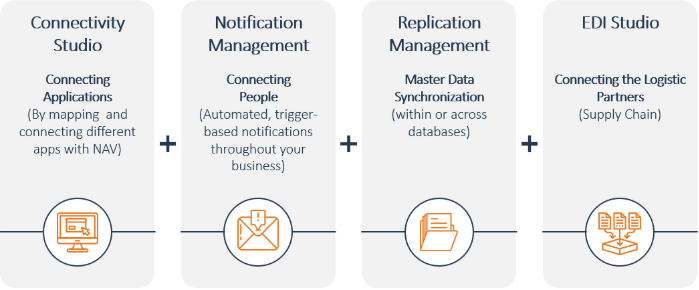
The second layer is the BIS app. This app contains only the business logic used by Replication Management, Connectivity Studio, Notification Management, and EDI Studio. The BIS app also contains the framework for label printing and BC Anywhere. The BIS app also does not appear in the Extension list in BC and functions as a dependency app.
The former BIS solutions are now separate apps. For example, if an organization requires Connectivity Studio, the user can install the CS app without also installing Notification Management, EDI, and Replication Management.
The following apps are available in the BIS solution:
- STAEDEAN-Common (dependency app)
- BIS App (dependency app)
- Connectivity Studio App
- Notification Management App
- EDI Studio App
- Replication Management App

The app landscape consists of several apps in several configurations. The rules are:
- STAEDEAN-Common is mandatory in all cases where STAEDEAN apps are installed.
- STAEDEAN-BIS is a prerequisite for Connectivity Studio, Replication Management, Notification Management, EDI, and label printing.

BIS granules
Business Integration Solutions for Dynamics 365 Business Central Wave 2 requires the granules indicated in the table below. This table also shows the relation to the application areas (Basic, Extended, Advanced). In the BIS application, User Experience and Application Area are linked:
- User Experience: "empty" = Application Area: Basic
- User Experience: Essentials = Application Area: Extended
- User Experience: Premium = Application Area: Advanced
For Microsoft Dynamics Business Central 365 V13 & 14 & Microsoft Dynamics NAV
STAEDEAN Business Integration Solutions provides generic functions and tools for creating a wide range of message and data integrations across several systems. Business Integration Solutions builds on the STAEDEAN Solution Center for Microsoft Dynamics BC365/NAV. It also acts as an integration platform across various applications.
Business Integration Solutions for Microsoft Dynamics BC365/NAV configures connections between the Microsoft Dynamics BC365/NAV database and an external party.
Business Integration Solutions for Microsoft Dynamics 365 Business Central configures connections between the Microsoft Dynamics 365 Business Central database and an external party.
Using the pipeline principle, the following steps describe how to configure a connection in BIS for Business Central.
Export data from Microsoft Dynamics 365 Business Central
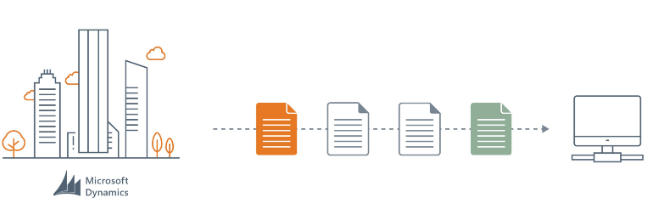
Define which data to export: Create an internal document to define which data to export from the Microsoft Dynamics 365 Business Central database. This document is a model of a data set consisting of tables, fields, and relations. Based on the existing Microsoft Dynamics 365 Business Central tables, you can easily define the internal document.
Define when to export the data: In many cases, you want to export data when a record changes in the database; for example, when a new sales order is created. In other cases, you may choose to export based on a time interval (for example, every Monday morning at 9:00 AM) or when a user selects a button. Add an event as the first pipeline element. An event triggers the pipeline. Based on your requirements, add the appropriate event to the pipeline.
Define how to export the data: By default, data exports as an XML file. In many cases, you may prefer to export in CSV format or as a fixed-length file. The standard table structure may also not match the required structure of your exported file, and you may need to perform calculations or use function expressions to generate extra data. Add a series of activities to the pipeline based on the format you want to export. If you want to export the data in another structure, create an external document. This external document describes how the data exports in an XML hierarchy structure. Use mapping to establish the relation between the internal and external document.
Define the export location: Export data to a file location or to an FTP server location. Add an endpoint as the final pipeline element. On the endpoint properties page, define the file name of the exported file. You can use data from Microsoft Dynamics 365 Business Central to generate a file name; for example, adding an item number to the file name of your exported XML file.
Import data into Microsoft Dynamics 365 Business Central
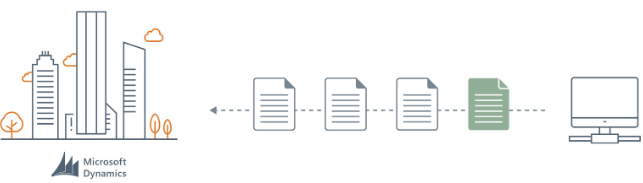
Define the documents: Based on the file to import, generate an external document. The external document describes the structure of the files to import. Use the Create Document From Sample File action to create an external document. Also define an internal document. The internal document describes which tables and fields your external data imports into.
Define the file location: The first pipeline element for an import pipeline is typically a reading endpoint, for example, the Azure File Reader endpoint. On the endpoint properties page, define the specific settings for the endpoint.
Define how to import the data: If the file structure does not match the Microsoft Dynamics 365 Business Central table structure, add the Mapper activity to the pipeline. On the activity properties page, define how the data imports and into which tables. The final pipeline element (the Record Generator Activity) imports the data into Microsoft Dynamics 365 Business Central. Defining how data imports is a vital step in your configuration.